Hey guys! 🙂 This is my first “Photography Tip Tuesday” post! Let me know if this is something you would like to see weekly. This particular post is a little more advanced, but the posts will range from beginner to advanced!
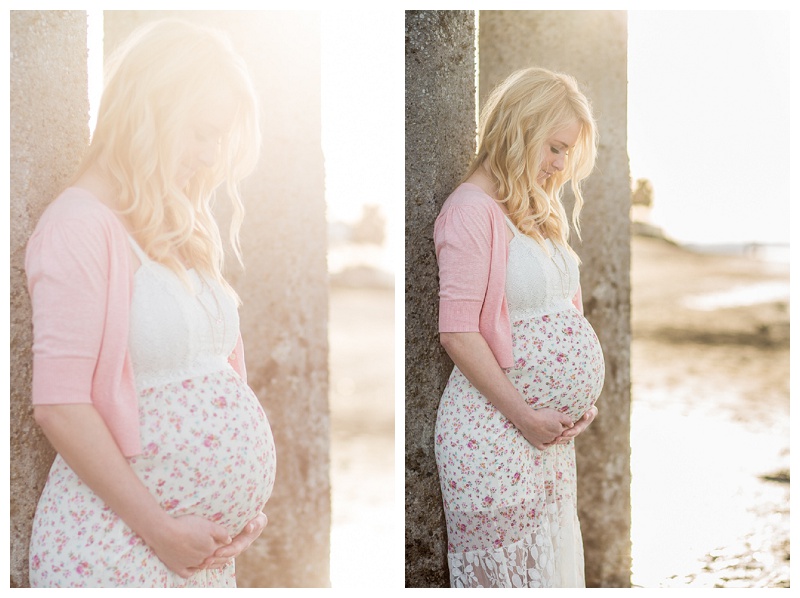
Above I posted an example of improper and proper backlighting (at least for my personal taste!). In the first photo you can see that the haze has taken over the subject’s face. I intentionally let too much sun into my lens as an example and it was difficult to even grab focus on her. In the second image, the subject stayed where she was but I took a step to the left so that the concrete of the pier she was standing against shielded more of the sun coming into my lens. This left a warm sunny look to the image and beautiful rim lighting in her hair!
Backlighting a subject is when you place your light source (in this case the sun) behind them and you shoot directly into the light source. Honestly, I always thought this was a huge no-no before I learned how to do it right! This technique can create beautifully warm images if done right and happens to be my absolute favorite way to shoot!
Here are a few tips to keep in mind if you decide to try backlighting:
1. Staying within one – two hours of sunrise or sunset will help create soft lighting. I strongly prefer to avoid the harsh midday sun and try to schedule all of my outdoor sessions about 90 minutes before sunset (because I so don’t want to wake up at dawn lol!).
2. Place your subject in the open sun, but place yourself in the shade. This takes the direct sun rays out of your lens.
3. If there is no shade available, position yourself to use an object like a tree or building in the distance to block part of the sun. Leave just a portion of the sun exposed to achieve that beautiful warm and sunny look.
4. If you don’t have shade or an object to block out the sun, you can use your hand or a reflector. When using your hand you can literally shield your lens like you would shield your eyes from the sun. Think of those 90’s visors!
5. Expose for your subject’s skin, not the sky, unless you are going for a silhouette. If you expose for the subject’s skin you may need to bring the highlights in the sky down a bit in post production.
I hope this was helpful! Let me know if there are any questions!